

In 2018 a paint of Edmond de Belamy made by machine learning (GAN) was sold for $432,500 in online auction, Christie’s. This made Chritie’s the first auction house that sell works created by machine learning. On an unbelievable price. What do you think about this ? Will machine learning help us create arts, or will it kill our creativity?
Intro

Is artificial intelligence set to become art’s next medium? - Chritie’s
Prerequisites: - CNN - Keras
As discovered by Ian Goodfellow1 , GAN is consisted of two neural networks named Generator and Discriminator. The Generator was built to create fake images, while the discriminator was built to identify those fake images as fake. Essentially, it’s not always have to be fake image. The GAN architecture can build any other type of data like sounds or videos.
Course Objective :
- Implement (not optimize) DC-GAN using Keras
Motivational Examples
Before we go into implementation of GAN, let’s see how GAN(s) changes overtime.

Since it’s first appearance in 2014, and with the rising of Computer Vision - CNN, GAN grew rapidly. It’s now able to generate a stunning images, that even our eyes cannot distinguish whether it’s real or fake! Current most state-of-the-art GAN are StyleGAN, and you can check it’s result in thispersondoesntexist.com. Let’s see several types of GANs
CGAN (Conditional GAN, 2014)

GAN was originally created to be trainable with only ONE class. If you train your GAN with dog images, it can generate dog images. If you train your GAN with cat images, it can generate cat images. But, what if your GAN was trained into both cat and dog images ? It will generate a blurry animal. To overcome this, Mirza2 created CGAN that can diffrentiate multiple output.
This work also make it possible to guide an image into something else like example below

source: https://papers.nips.cc/paper/6644-pose-guided-person-image-generation.pdf
CycleGAN, 2018
In 2018, Zu3 create a CycleGAN, A GAN that Doesn’t Generate Fake Images. Instead, it transfer styles between images.
Have you ever imagine a horse with zebra lines ?

Or, playing Fortnite with PUBG style?

Unlike Style Transfer, cycle gan is not limited by domain, wich means, you can do text-to-image style transfer!

Sources: Zebra-Horse,Fortnite-PUBG, text-image
SAGAN (Self Attention GAN, 2018)
After Computer Vision takes over ML’s attentions for years, eventually it face a saturation phase, where it’s considered as State-of-the-art model for Image Classifiation, Detection, Segmentations, etc. There’s nothing such a new architecture, everything is CNN. That’s when NLP kicks in. Thanks for Transformers, NLP started to find a new hope, and generated a model called Attention. This idea then inspired Zhang4 to create a Self Attention GAN that can help them focus on the context of the images. His model then considered as the state-of-the art GAN. But not for a long time.

ProGAN (2018)
Training GAN is hard. Knowing that the Generator and Discriminator fighting each other, GAN losses somethimes become unstable and can jumped just after the model started to look converge.

Source: Medium
In order to face that, Karras5 and his mates from NVIDIA started to build a GAN that gradually increasing it’s size in order to maintain training stability. This method get a lot of compliment as it nominated as state-of-the-art.
BigGAN (2019)
In 2019, Brock6 and his teammates from Google Deepmind attempted to create a GAN that run on a large scale of TPU cluster. Hence the name, BigGAN. No one have ever tried to train GAN on such a large cluster of machine. Now you know the power of Google.

Source: Brock’s Paper
Despite it’s kind of meaningless name, this model really, really, made an improvement of GAN. It can generate very realistic images in large dimension (512x512). It’s inception score also killed the previous state-of-the art models from 52.52 into 166.5.
StyleGAN
GANs already reach its point wich it can generate a hyper-realistic images. But GAN it’s such a meaningless if we can’t generate another object from it. Still from NVIDIA instead of continue creating more realistic images, Karras7 focused on making GAN that can be controlled over a style, hence the name StyleGAN. This mean you have big control of what image will you generate. Or more likely, How do you want the image to be.

Source: Karras’s Paper
This video from StyleGAN’s creator might help you understand how it works.
If you want to know more about GANs, there’s a repository contains all(I really hope it is) paper that related to GAN https://github.com/hindupuravinash/the-gan-zoo
I think that’s enough of some motivational intro. Now, let’s build our GAN. In this case, DC-GAN.
Implementation
For the sake of easness, we will be using MNIST dataset that already brought by Keras. Let’s first import our library
import tensorflow as tf
import numpy as np
import matplotlib.pyplot as plt

from tensorflow.keras.models import Sequential, load_model
from tensorflow.keras.layers import Dense, Conv2D, Flatten, BatchNormalization, Dropout
from tensorflow.keras.layers import Reshape, UpSampling2D, MaxPooling2D, Activation
from tensorflow.keras.datasets import mnist, fashion_mnist
from tensorflow.keras.optimizers import SGD, RMSprop
from tensorflow.keras.utils import to_categorical

from PIL import Image
After all the libary are imported, let’s load our data.
(X_train, y_train), (X_test, y_test) = mnist.load_data()
#(X_train, y_train), (X_test, y_test) = fashion_mnist.load_data()

X_train = (X_train.astype(np.float32) - 127.5)/127.5 # normalization
X_train = X_train[:, :, :, None]
X_test = X_test[:, :, :, None]
The Mnist images are 28x28x1 grayscale of handwritten digits. It contains 60000 set of train data and 10000 set of test data. If you haven’t seen it before, here’s what they looks like

Gan Basic Concept
GAN is consisted of Generator and Discriminator. In DC-GAN, the Generator and Discriminator are convolutional neural network. Let’s build a simple Generator and Discriminator, then combine them and finally train them.
Helper Functions
Some of you might not familiar in practicing with keras, especially building a non-API-ed models such as GAN. Building GAN (and other Deep Learning architecture as well) is like building a lego block. You build them piece-by-piece. >There should be one—and preferably only one—obvious way to do it
So, in order to help you build the GAN, We prepared several helpful function. You are not obligated to understand the codes, but We hope that you can figured out the big picture.
Combine Images
This function will arrange several images into one frame so that it will be easier to see. This is the sample result:
def combine_images(generated_images):
    num = generated_images.shape[0]
    width = int(np.sqrt(num))
    height = int(np.ceil(float(num)/width))
    shape = generated_images.shape[1:3]
    image = np.zeros((height*shape[0], width*shape[1]),
                     dtype=generated_images.dtype)
    for index, img in enumerate(generated_images):
        i = int(index/width)
        j = index % width
        image[i*shape[0]:(i+1)*shape[0], j*shape[1]:(j+1)*shape[1]] = \
            img[:, :, 0]
    return image
Generate Generator
Generator are made of several layers. The key idea is to : 1. Get input vector (often called “z”) 2. Feature Mapping using Dense 3. Reshape the vector into 2D 4. Do convolutions 5. Do uppersamplings 6. Output the Images
Process number 3-4 are often called “transpose convolutions” or “deconvolutions”. Please note that you can build your own Generator architecture.
def generator_model():
    model = Sequential([
        Dense(1024, input_dim=100, activation='tanh'),
        Dense(128*7*7), # This shape related to the reshape and output size
        BatchNormalization(),
        Activation('tanh'),
        Reshape((7, 7, 128)),
        UpSampling2D(size=(2, 2)),
        Conv2D(64, (5, 5), padding='same', activation='tanh'),
        UpSampling2D(size=(2, 2)),
        Conv2D(1, (5, 5), padding='same', activation='tanh')
    ])
    return model

generator_model().summary()
Discriminator
The Discriminator in GAN is basically a normal CNN that has to be trained to classify fake or real images. It supposed to work as : 1. Get input image (the fake one, built by Generator) 2. Do Convolutions 3. Do subsamplings (or poolings) 4. Reshape to 1D 5. Classify using Dense 6. Output the classification
def discriminator_model():
    model = Sequential([
        Conv2D(64, (5, 5), input_shape=(28, 28, 1), padding='same', activation='tanh'),
        MaxPooling2D(pool_size=(2, 2)),
        Conv2D(128, (5, 5),activation='tanh'),
        MaxPooling2D(pool_size=(2, 2)),
        Flatten(),
        Dense(1024, activation='tanh'),
        Dense(1, activation='sigmoid')
    ])
    return model

discriminator_model().summary()
Combining Generator + Discriminator
Now that we previously can create Generator and Discriminator, this function is merely combine both of them into one sequential. Generator first, followed by discriminator.
def combine_model(g, d):
    model = Sequential()
    model.add(g)
    model.add(d)
    return model
But it’s not over yet. The model is not ready for training. It must be compiled first. And to compile, we need several hyperparameters in order for them to train well : - optimizer (with learning rate) - loss function
So, let’s add the hyperparameters in training functions below.
Training Function
def train_gan(X_train, Y_train, batch_size, epochs, g, d, save_every=500, print_every=100):

    # Get the size of input (Z vector)
    z_size = g.layers[0].input_shape[1]

    # Combine discriminator on generator
    d.trainable = False # set Discriminator to be untrainable before merging
    d_on_g = combine_model(g, d)
    dg_optim = RMSprop (lr=0.0005)
    g_optim = RMSprop (lr=0.0005)
    d_on_g.compile(loss='binary_crossentropy', optimizer=dg_optim)

    g.compile(loss='binary_crossentropy', optimizer=g_optim)

    # Set Discriminator to be trainable
    d.trainable = True
    d_optim = RMSprop (lr=0.0005)
    d.compile(loss='binary_crossentropy', optimizer=d_optim)

    print("Number of batches", int(X_train.shape[0]/batch_size))

    # Start training
    for epoch in range(epochs):
        print("\n-------------------------------\nEpoch :", epoch)

        for index in range(int(X_train.shape[0]/batch_size)):

            # Randomly generate Z input
            noise = np.random.uniform(-1, 1, size=(batch_size, z_size))

            # Generate fake image from Z
            generated_images = g.predict(noise, verbose=0)

            # Take train data (real image)
            image_batch = X_train[index*batch_size:(index+1)*batch_size]

            if index % save_every == 0:
                image = combine_images(generated_images)
                image = image*127.5+127.5
                # Image.fromarray(image.astype(np.uint8)).save("train_ep"+
                #     str(epoch)+"_"+str(index)+".png")

                plt.imshow(image, cmap=plt.get_cmap('gray'))
                plt.axis('off')
                plt.show()

            # Concatenate images to train Discriminator
            X = np.concatenate((image_batch, generated_images))
            y = [1] * batch_size + [0] * batch_size

            # Train Discriminator
            d_loss = d.train_on_batch(X, y)

            # Randomly generate z to train Generator
            noise = np.random.uniform(-1, 1, (batch_size, z_size))

            # Set Discriminator to be untrainable before training the GAN (for generator)
            d.trainable = False

            # Train GAN (for the generator)
            g_loss = d_on_g.train_on_batch(noise, [1] * batch_size)

            # Print loss
            if index % print_every == 0:
                print("batch %d, g_loss : %f, d_loss : %f" % (index, g_loss, d_loss))

            # Set Discriminator to be trainable
            d.trainable = True


    return g, d
If you think that it’s hard to understand those code, don’t worry. Now let’s move to the main part.
Let’s build our GAN
Initialize Model
z_size = 100
g_model = generator_model()
d_model = discriminator_model()
Train GAN
batch = 225
epochs = 15
g_model, d_model = train_gan(X_train,y_train, batch, epochs, g_model, d_model)
Here’s how our model fake images after trained for each epoch

Generate Images
Now that our model have the understanding of how to draw an mnist image, let’s try to generate one.
Generate image only from generator
As we trained our GAN, we trained our Generator to generate fake images (in this case, handwritten digits). So, given an input of random z vector, our Generator is supposed to generate a handwritted images. Let’s try make 100 of it!
def generate_images(g, batch_size):
    z_size = g.layers[0].input_shape[1]
    noise = np.random.uniform(-1, 1, (batch_size, z_size))
    generated_images = g.predict(noise, verbose=1)
    image = combine_images(generated_images)
    filename = "generated_image.png"
    image = image*127.5+127.5
    Image.fromarray(image.astype(np.uint8)).save(filename)
    return image

images = generate_images(g_model, 100)
plt.imshow(images, cmap=plt.get_cmap('gray'))
plt.axis('off')
plt.show()

Generate images from generator with discriminator check
Basically our Generator is capable enough to do the job. But is there any possible way to make the generated images looks more realistic?. You’re right ! Pass them to the Discriminator. Previously, our Discriminator has the capability to classify fake images. So, let’s use it as QA agent. If our fake image is classified as real, then, by concept, it should be more realistic than images that clasified as fake. Without furder ado, let’s try it !
def generate_best_images(g, d, batch_size):
    z_size = g.layers[0].input_shape[1]
    noise = np.random.uniform(-1, 1, (batch_size*20, z_size))

    generated_images = g.predict(noise, verbose=1)
    d_pret = d.predict(generated_images, verbose=1)

    index = np.arange(0, batch_size*20)
    index.resize((batch_size*20, 1))

    pre_with_index = list(np.append(d_pret, index, axis=1))
    pre_with_index.sort(key=lambda x: x[0], reverse=True)

    nice_images = np.zeros((batch_size,) + generated_images.shape[1:3], dtype=np.float32)
    nice_images = nice_images[:, :, :, None]

    for i in range(batch_size):
        idx = int(pre_with_index[i][1])
        nice_images[i, :, :, 0] = generated_images[idx, :, :, 0]

    image = combine_images(nice_images)
    filename = "generated_image_best.png"
    image = image*127.5+127.5
    Image.fromarray(image.astype(np.uint8)).save(filename)
    return image

images = generate_best_images(g_model, d_model, 100)
plt.imshow(images, cmap=plt.get_cmap('gray'))
plt.axis('off')
plt.show()

Congratulations! you now can generate realistic handwritten images using Generator and Discriminator simultaneuosly. What? you want to generate specific number?
Latent Vector Operations
It was found that the z vector of specific class tends to have a similarity. It’s later said that for a specific class, there should be a vector z that represent it. Now it’s called Latent Vector. So, in order to create image of number “1”, you can easily do an average of z vector that generates “1”, use it as input of Generator, and Voila ! You will create a number “1” (conceptually).
Refereces:
- Goodfellow, Ian J. - Generative Adversarial Nets, 2014 [return]
- Mirza, M. - Conditional Generative Adversarial Nets, 2014 [return]
- Zhu, JY. et al - Unpaired Image-to-Image Translation using Cycle-Consistent Adversarial Networks, 2018 [return]
- Zhang, Han - Self-Attention Generative Adversarial Network. 2018 [return]
- Karras, Tero- Progressive Growing of GANs for Improved Quality Stability and Variation, 2018 [return]
- Brock, Andrew - Large Scale GAN Training for High Fidelity Natural Image Synthesis, 2019 [return]
- Karras, Tero - A Style-Based Generator Architecture for Generative Adversarial Networks, 2019 [return]
 More details
 More details
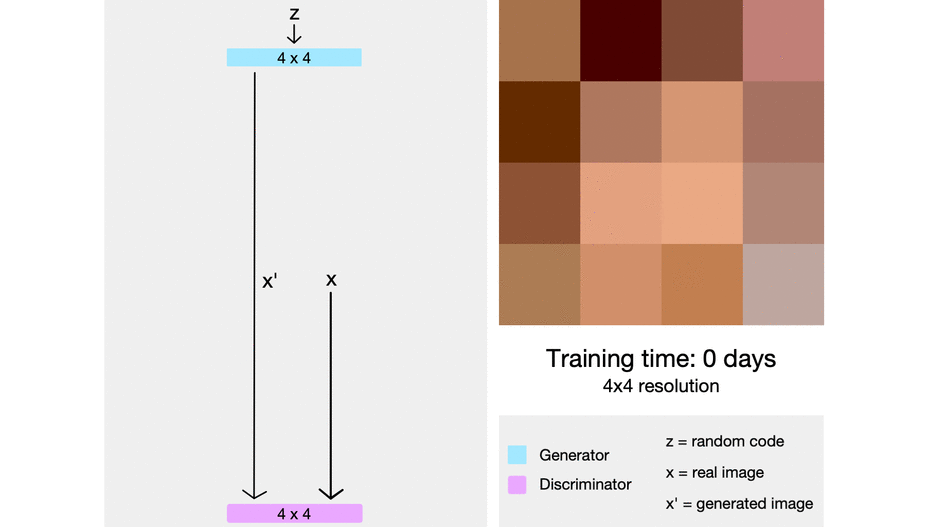
Share this post
Twitter
Facebook
LinkedIn